| Need a last minute costume? Here's a shortcut. These Halloween makeup looks will get you in disguise just in time for October 31 |
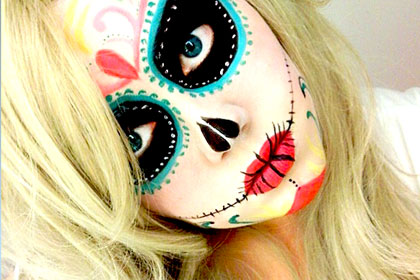 This is a TotalBeauty.com Halloween makeup article If you're tired of recycling the same old cat or witch costume every year, try one of these six DIY makeup looks. And no these looks won't require hours of prep or tubs of fake blood. All you need is a little face paint, lipstick, and eyeliner for a completely original costume. So toss that tired tiara and check out our favorite Halloween makeup looks now. |

Showing posts with label diy. Show all posts
Showing posts with label diy. Show all posts
Tuesday, October 30, 2012
6 DIY Halloween Makeup Ideas

Monday, January 30, 2012
Depotting Solutions by Ren of Makeup by Ren Ren

When I put everything in the palette, my shadows were sliding around and wasn't as secure. My first experience with the Z palette, my Make Up For Ever pan shadows were cemented in that palette. No worries at all. This time was different. Luckily, I was browsing my YouTube subscriptions and saw that Ren had just posted a video solving the problem!
Check out her latest vid for the solution!
Depotting Shadows into a Z-Palette & Making them Stick!
Friday, April 22, 2011
Update and My experience with Sally Hansen Salon Effects Nail Strips
About a week ago, before I took off my Sally Hansen Salon Effects Nails Strips designs this was the state of affairs!
 My nails were grown out and ready to be refilled! They lasted a good long time and they were always conversation starters. It was funny to have even men notice!
Here are the instructions that came with the set: (click to enlarge)
 So I basically 1-found a strip that would fit my nail, 2-pulled off the back and aligned it with my cuticles. In real life, I left the slightest of gap between the strip and cuticle because I didn't want to make it look like I over jumped my cuticles. In photos, it seemed best to fit the strip right up against my cuticles. 3-I pulled the access over my nail and went to work with the buffer and file that was enclosed. The file helped to wear away the access and the buffer helped to smooth out the strips edges on the ends of my nails.
The above scanned instructions or my basic instructions aren't enough? Well, dang!
Brit's got you covered....
Most of the strips didn't fit the width of my nails, so here's what helped and other tips:
-Remember I said my nails had the black glitter acrylic still on them? Well the black peeked out a bit (the glitter wasn't as apparent) so it matched the design and camouflaged the areas that weren't covered.
-I put a clear coat of polish over the strip after I let it set and adhere to my nails (During this time that I let it set, I washed my hands, did chores, etc. just to see if I would get some extreme peeling or something.)
-Try to wrap your nail with the strip as you may do with your polish to prolong the wear, BUT with acrylics, they are thicker than a natural nail and you may find yourself filing away the portion of the strips that you wrapped under your nail.
OVERALL, these wore like a charm, I enjoyed the DIY designs, and even though I had another pack to try, I bought two more packs (hounds tooth and another pack of lace design)! I LOVE THEM!!
Have you tried them? How do you like them?
Friday, June 06, 2008
Yummy411: Go Mommy Go!- Get Your Feet Summer Ready
This post is for Muthasfynest!
(photo credit)
 Anyone else amazed at how fast Spring has gone by and Summer is right upon us? Many of us, especially our mommies on the go, haven't been able to make time to get that much needed 'out of winter' pedicure. You may have cheated and faked a pedi for your peep toes, but with the weather heating up to 90 degrees in my area, you have to go full on flip flops and sandals, exposed heels and all!
Let's try a quick fix until you get to the nail salon!
1. The day before you plan to wear your sandals, head to CVS or your local drugstore and invest in a PedEgg ($10, Cvs.com). After checking out that link, are you a believer? Be sure to use on dry feet!
2. Clean your tootsies (scrub and clean around and under nails thoroughly). Pull out your old faithful Vaseline/petroleum jelly and moisturize feet. Sleep with socks on. Have sock phobia? Use a minty scrub and rub with an essential oil.
3. Next day, give your toe nails a good filing and polish over those babies with NYC Nail Glossies in #215 ($1.99), Linen, a sheer off white, cream color with minute silver shimmer that gives the cream a nice shine. Use 1-3 coats for your desired opaqueness (I use 3). Using a nude, subtle white color gives a fresh appearance without drawing too much attention to the feet if polish chips.
4. Schedule a pedi to start the summer off right!
Go Mommy Go!
If you have any other suggestions and or product recommendations for feet care for mommies on the go or other busy ladies in demand, leave them in the comments!
Wednesday, April 02, 2008
Yummy411- Drugstore Paparazzi NYX
On my recent trip to the drugstore (Rite Aid), I found some new goodies on the shelves:
 This isn't new, but since forever, this image of this chick has made me aspire to be a bronze beauty goddess. Isn't she just gorgeous?! We know that companies and pics lie, so I've never picked up a PP bronzer. I've heard all the raves of the shimmer/bronze strips, but I have enough already for a lifetime!
 Here's more from Jesse's Girl, though these shades aren't new and are found in the regular lineup. However, the eye shadow transformer is. Hmm, I'll pass on the $5.99 price tag with my glycerin at home. Anyone have experience with this or packaged transformers and how they compare with DIY transformers? (Kris, check the Jean Nate' bubble bath to the right, in HUGE bottles LOL!)
 Maite presents NYX! Finally, on shelves near me! Pictured- glitter pencil sticks. I picked up the green and white pencils. I love glitter. Not for all over shimmer, but as accents with makeup for more dimension. Black glitter on a smokey eye.. yum! I wish they would have sold a black glitter =/ Reatil $3.49. The stick spreads the glitter evenly without the color of the actul stick being prominent. Staying power? Hmmm, a lot left to be desired. UDPP opens a world of possibilites, so we shall see.
 Blusher and bronzer oh my! I swatched the darkest bronzer mosaic pot and it seemed a bit light. I think it would work well on me, but I'm not so certain for darker skintones. The pinker blush may work.. try it for yourself! I got a small drugstore haul. I would like to use some of the items for a bit longer before reviewing.
Tried any of this stuff? What's new in your neck of the woods and what should I look out for at my drugstore?
Subscribe to:
Comments (Atom)